The
break was wonderful, and it's nice to be back. This weeks was a week
full of new beginnings in the art room - lots of painting, drawing,
brainstorming, and critical thinking!
Kindergarten
students were introduced to "printmaking" this week. We broke the word
down into "print" and "make". The students agreed they know how to
"make" things without a problem. I then asked them about "print".
Students told me that they print things off the computer and they print
with stamps. We talked a little bit more about how both those things
are used to create the same image over and over again! I explained that
is exactly what printmaking is - making the same print or picture over
and over!
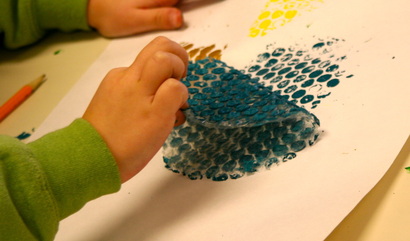
 I did a quick demonstration on how to load the brayer
with paint, roll it on pre-cut pieces of bubble warp, and 'print' the
bubble wrap on their paper. You would think I was performing magic the
way they responded to the print! I then explained a few more things
including procedures for clean up and sent them off to their seats!
I did a quick demonstration on how to load the brayer
with paint, roll it on pre-cut pieces of bubble warp, and 'print' the
bubble wrap on their paper. You would think I was performing magic the
way they responded to the print! I then explained a few more things
including procedures for clean up and sent them off to their seats!
These turned out beautiful! I have no idea what we are going to do with them, if anything. I had originally thought to use them in a collage next class, but I am also thinking of leaving them the way they are. I will have this all figured out by next class.
I did a quick demonstration on how to load the brayer
with paint, roll it on pre-cut pieces of bubble warp, and 'print' the
bubble wrap on their paper. You would think I was performing magic the
way they responded to the print! I then explained a few more things
including procedures for clean up and sent them off to their seats!These turned out beautiful! I have no idea what we are going to do with them, if anything. I had originally thought to use them in a collage next class, but I am also thinking of leaving them the way they are. I will have this all figured out by next class.
1st Graders learned about "profile portraits". We started out by looking a short slideshow filled with examples of profile portraits. I asked the students to raise their hand when they could tell me something ALL the pictures had in common. The students then told me that all the people were facing off to the side. So, next I asked how they knew they were facing sideways. You could almost hear the gears turning in their heads with quizzical looks on their faces trying to figure out both how they knew that and how to explain it. Sure enough, they needed a little help. I asked them to show me on their fingers how many eyes they SEE. I told them to count the eyes they SEE. Most kids had one little finger up, a couple of two. We then counted the eye together - sure enough there was one! I asked them if the person was real and they turned to face the class how many eyes would they see? -- TWO! an Ah-ha moment for sure.
We talked a little longer about profiles - I traced one of the faces on the board to show that the nose points off the face in the direction it is facing, along with only seeing half the mouth. I had the students do some guided practice by drawing a series of pictures on the board and the students showed me on their fingers which one picture,out of three, had a correct profile.
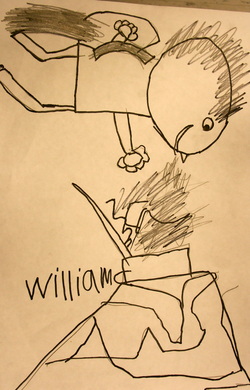
There was a lot of excitement when the students learned their profile portrait was going on a tooth fairy! I will post the whole lesson after the pictures are done!
2nd Graders are working on using visual texture in their artwork.
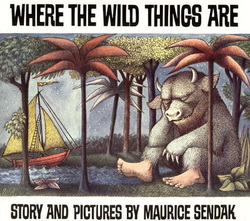
We started out by reading the book "Where the Wild Things Are". I told the students that their job during the story was to pay close attention to the wild things! At the end of the book I had the students share what they noticed - quickly they share that each wild thing is made up of different types of animals! We then discussed how the scaly body looked bumpy, but the page didn't feel bumpy. Ah-hah - visual texture!
This book was the inspiration for their own "Wild Thing" - more to come.
3rd Graders did some serious critical thinking
this week. As soon as they walked in I told them I was going to write a
question on the board and I wanted them to think about it - not talk,
but think. They needed to decide yes or no as their current answer.
I wrote on the board, "Can people who are blind understand color?"
I asked them to think about if they had never, ever seen any type of color - could they understand that an orange was orange, or that the sky was blue, or their favorite color was green?
I let them mull it over, had them put down their heads and we took a quick poll. In most of my classes it was overwhelming "No". Students that wanted to share their reasons were allowed (well at least for a while - we only get 50 minutes!). Next, I asked them if someone was deaf could they understand music?! Students jumped all over using other sense to understand music - reading it, watching it, feeling it. Slowly they started to connect that maybe if a deaf person could use other senses to understand music - maybe, just maybe someone who was blind could use other senses to understand colors.
Next, my favorite part, we conducted a little experiment. I told students I would need a volunteer that would be willing to be blindfolded, then handed an object that they needed to report the color on. It always amazes me how many kids want to try this infront of the class! I do my best to pick equal numbers of boys and girls, though not everyone gets a chance.

The first students come up, I blindfold them. I ask them to make sure they can't see - it won't work if they can see! Then I tell the class that the only way it will work is if the WHOLE class can stay quiet! If someone blurts something out or makes a comment it might ruin the experiment. Next, I hand my blindfolded student an orange. Almost immediately they can tell me that it is an orange and it is the color orange. I asked who they figured it out so quick -- they generally said the shape, texture, and the smell! We continued this for a few rounds making the materials harder and harder to guess!
We then read an awesome story called "The Black Book of Colors" in which a child who is blind, Thomas, describes colors to us using his senses. All the pictures are on black paper and have no color - but instead can by felt by the finger tips. The story is also written in brail across the top of each page.
After the book I told students we were making our own "Black book of Colors".
The next steps proved to stretch the thinking of the third graders as they were asked to describes colors through - taste, smell, sound, and touch.
I will post more when we are further in the project!
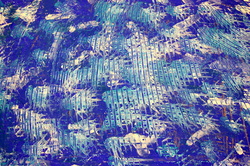
4th Graders decorated paper for collages we will be starting!
This summer I was walking the streets at Royal Oak's "Arts Beats Eats" and found an artist that I was fascinated with. I came home and found her website knowing I wanted to do a project inspired by her work.
Students used pre-picked color groups to make their papers. I asked them to layer their paint and experiment with paint brushes, texture boards, toothbrushes, combs, and q-tips. The results are BEAUTIFUL!
5th Graders are pumped out their project! We first looked at a slideshow of Logos. I had the students tally on their hands how many of the logos they knew - of course they knew them all!
I had a slide with a few different companies and how their logo has changed over the years - more simple and more unique at the same time thanks to computer graphics!
Next, I explained they were going to make their own logos, personal logos made out of their initials. The 5th graders were PUMPED! I originally did this lesson with 8th grade students, and these 5th graders blew my socks off with their ideas.
I passed out a brainstorming sheet that helped them create different forms of their letters, thus helping them create something completely original and personal.
I wrote on the board, "Can people who are blind understand color?"
I asked them to think about if they had never, ever seen any type of color - could they understand that an orange was orange, or that the sky was blue, or their favorite color was green?
I let them mull it over, had them put down their heads and we took a quick poll. In most of my classes it was overwhelming "No". Students that wanted to share their reasons were allowed (well at least for a while - we only get 50 minutes!). Next, I asked them if someone was deaf could they understand music?! Students jumped all over using other sense to understand music - reading it, watching it, feeling it. Slowly they started to connect that maybe if a deaf person could use other senses to understand music - maybe, just maybe someone who was blind could use other senses to understand colors.
Next, my favorite part, we conducted a little experiment. I told students I would need a volunteer that would be willing to be blindfolded, then handed an object that they needed to report the color on. It always amazes me how many kids want to try this infront of the class! I do my best to pick equal numbers of boys and girls, though not everyone gets a chance.
The first students come up, I blindfold them. I ask them to make sure they can't see - it won't work if they can see! Then I tell the class that the only way it will work is if the WHOLE class can stay quiet! If someone blurts something out or makes a comment it might ruin the experiment. Next, I hand my blindfolded student an orange. Almost immediately they can tell me that it is an orange and it is the color orange. I asked who they figured it out so quick -- they generally said the shape, texture, and the smell! We continued this for a few rounds making the materials harder and harder to guess!
We then read an awesome story called "The Black Book of Colors" in which a child who is blind, Thomas, describes colors to us using his senses. All the pictures are on black paper and have no color - but instead can by felt by the finger tips. The story is also written in brail across the top of each page.
After the book I told students we were making our own "Black book of Colors".
The next steps proved to stretch the thinking of the third graders as they were asked to describes colors through - taste, smell, sound, and touch.
I will post more when we are further in the project!
4th Graders decorated paper for collages we will be starting!
This summer I was walking the streets at Royal Oak's "Arts Beats Eats" and found an artist that I was fascinated with. I came home and found her website knowing I wanted to do a project inspired by her work.
Students used pre-picked color groups to make their papers. I asked them to layer their paint and experiment with paint brushes, texture boards, toothbrushes, combs, and q-tips. The results are BEAUTIFUL!
5th Graders are pumped out their project! We first looked at a slideshow of Logos. I had the students tally on their hands how many of the logos they knew - of course they knew them all!
I had a slide with a few different companies and how their logo has changed over the years - more simple and more unique at the same time thanks to computer graphics!
Next, I explained they were going to make their own logos, personal logos made out of their initials. The 5th graders were PUMPED! I originally did this lesson with 8th grade students, and these 5th graders blew my socks off with their ideas.
I passed out a brainstorming sheet that helped them create different forms of their letters, thus helping them create something completely original and personal.
4 comments:
Very cool! Keep up the good work.
Ooh, please post more about the logo project when they're complete!
Kristina there will be a post in the next couple of days! The kiddos are just finishing them up - and they look AMAZING!
Kristina - I have posted about the logos!
Post a Comment